Jarvis Bamboo Standing Desk
When I got my recently acquired iMac, I got a sit/stand desk to go with it. I spend a lot of time at my desk and while I knew it wouldn’t be cheap, it seemed like a good investment in my comfort and health.
I have used a standing desk in the past, at a former workplace. In that case, the desk was standing only. What I wanted was an adjustable sit/stand desk that I could switch back and forth.
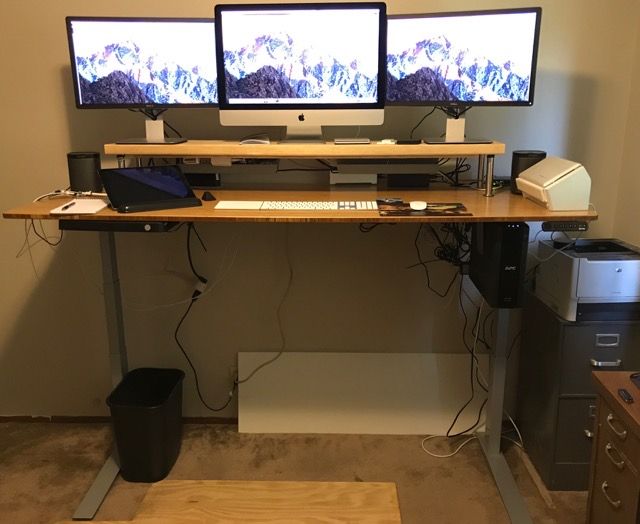
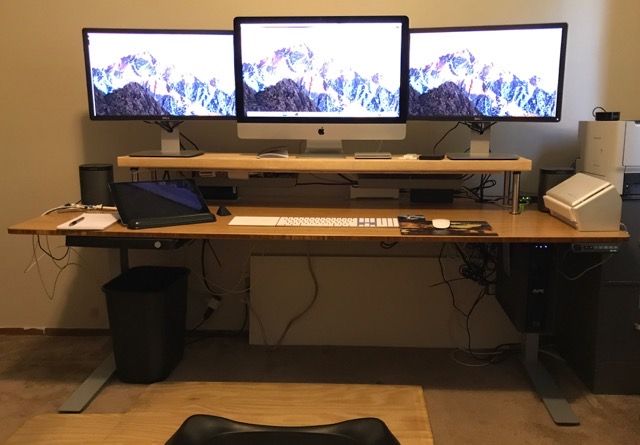
The desk I bought is a Jarvis Bamboo from fully.com, based on The Wirecutter’s recommendation. They offer the Jarvis Bamboo in a variety of sizes. I got the largest one to accommodate my three-monitor setup: 78”x30”. This is only slightly larger than my old desk and “printer stand” so despite the size I didn’t have to move much furniture to accommodate it.
There are two options for the adjustable height, one that adjusts from 27.25” to 46.5” and an extended range version that goes from 24.5” to 50”. I’m 6’5”, so the extended range version was a must for me, but I think that even those who are not at one extreme or the other height wise should consider it. At 30” wide this desk would be too wide to fit through some doors, including the relatively narrow door to my office. Before I got the desk I was concerned that when it was time to move I would have to disassemble the desk to get it out. Once I got it, however, I realized that if I lower it all the way down it’s actually shorter than it is wide, so I could flip it on it’s side and get it out that way. So when considering how much height adjustability you need, take a look at how wide your office door is in addition to how tall you are.
One upgrade that was well worth the price is the programmable memory controller. Rather than having to stand there pushing the up button while the desk rises, then bumping it up and down until I hit the height I want, I can just program my sitting and standing heights and switch between them with a single button press. It can memorize up to four options, so you could have sitting and standing heights for two different people.
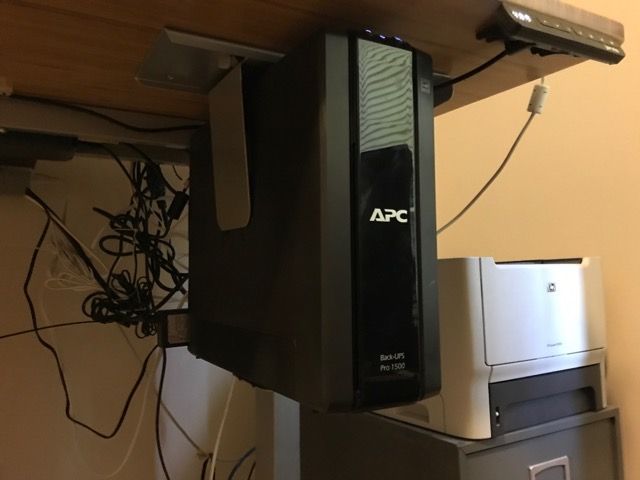
I bought a big, beefy Uninterruptible Power Supply (UPS) along with my new iMac, and I wanted to have that on the desk, rather than having a bunch of power cables going up and down every time I changed the desk height. I could have just put it on top of the desk, but fully.com offers CPU Holders that attach to the bottom of the desk surface and hold mini-tower PCs. The APC UPS that I bought is about the same size as a mini-tower, so I got one of the CPU holders and mounted it underneath the desk (the UPS is heavy enough to require their heavy duty CPU holder).
I also picked up some cable trays and a neat swiveling pencil tray to hold pens and post-it notes, since I’m giving up my desk drawer.
One must-have with a standing desk is some sort of padded floor mat. When I was running a standing desk at work I just used a cheap one from Walmart, but fully.com offers an interesting option: the the Topo Anti-Fatigue Mat. It’s contoured with an angled lip around the edges and a bump in the middle to encourage you not to just stand there flat footed. They give a big discount for ordering it with a standing desk, so I picked one up. I think I like it so far, though I have almost tripped a couple of times when stepping back from the desk.
The Jarvis Bamboo comes disassembled in two heavy boxes; one for the desktop and one for the frame. Get someone to help you carry them if you can.
The desktop has holes pre-drilled for the legs and frame rails and those went in pretty easy. I should have pre-drilled some holes for the CPU holder and pencil tray, but I was afraid of overdrilling and coming out the desktop. It would have saved me several stripped screws. Other than that it went together pretty easy, with clear instructions. A power screwdriver with quite a bit of torque is definitely helpful. I had to hand tighten some of the frame screws, even with the pre-drilled holes.
I like my monitors fairly high for good ergonomics, whether I’m sitting or standing. Fully.com offers monitor arms with their desks, which would work with the VESA mounts in my two Dell monitors, but not my iMac. Instead I decided to go with a riser shelf like I had on my previous desk. I spent a ton of time looking for something pre-made, but there was nothing out there tall enough or wide enough. All the commercially available monitor risers are designed to raise the monitor a few inches, which is nowhere near enough for my height. I ended up getting a 2x12 at Home Depot and having them cut it to 60”, and attaching a set of legs from Ikea. This worked out rather nicely, and while unfinished lumber is a bit low rent it doesn’t clash with the bamboo desktop too badly.

Overall I’m very happy with the new desk. It does a great job with my three-monitor array and the big work surface is super useful (as long as I keep it clean and uncluttered). Being able to switch between sitting and standing lends a lot of variety and I certainly feel better after working at my desk for a long time. The new desk is so much nicer than my setup at work it’s inspired me to arrange to work from home one day a week.
July 31, 2017
My Multi-Monitor Setup
I have always been interested in getting as much screen real estate as I can on my computers. In the early 2000s, when dual outputs on video cards were first becoming widely available I ran a pair of 19” CRT monitors and ever since my main machine has had at least two displays. My new iMac has given me the opportunity to create something pretty close to my ultimate setup.
The iMac can support one 5K external display or two 4K displays. I opted for the two 4K displays, both because that provides more screen real estate for less cost, and because it allows me to create a symmetrical arrangement (the iMac in the center with a secondary monitor on either side).
4K displays are available in 21”, 24”, and 27” sizes. The 21” seemed like it would be a bit small for displaying two apps or webpages side by side, especially since the secondary monitors would be further from my eyes. I’ve read several places that stretching 4K over a 27” monitor doesn’t look as nice as the smaller displays. The sweet spot for 4K displays seems to be 24”.
I went with the Dell P2415Q, a 24” 4K display recommended by The Wirecutter and Katie Floyd. It’s a nice monitor. The picture is very crisp, though the color and brightness can’t compare with the iMac’s built-in display. After playing around with the scaling in display preferences it does a good job showing two side-by-side apps, showing the full content in each app while not being too small to read comfortably. I’m very happy with them so far.
One of the keys to using a big multi-monitor setup like this is to be thoughtful about how you place your apps. Don’t just spread windows out willy-nilly. Each part of my desktop has a particular role.
The center screen is obviously where I do most of my work. It’s usually home to either one maximized app that fills the entire screen or two apps running side by side (often Reeder and Safari).
The right half of the left-hand monitor and the left half of the right-hand monitor are for my supporting apps. While I’m doing something on the center screen I might be using one of these positions to take notes in Bear, move cards around in Trello, or reference an email.
Several years ago I was running a pair of 24” monitors on my work machine I usually sat in front of the right-hand monitor and I often found that the left half of the left-hand monitor often ended up “out of sight, out of mind”. I didn’t want that to happen with this setup, so I try to be very thoughtful about what goes on either end of my desktop. I use the left half of the left-hand monitor and the right half of the right-hand monitor for apps that I want to be able to see at a glance, but don’t need to pay continuous attention to, like the Sonos controller app.
One important thing to note is that while different parts of my desktop fill different roles, apps aren’t necessarily confined to a single role or position on my monitors. For instance, OmniFocus usually lives at the extreme right side of my desktop (the right side of the right-hand monitor) so I can glance over and see my task list. However, when I’m doing my weekly review OmniFocus takes center stage and moves over to my main monitor. Similarly, when I’m using Bear to take notes, it lives on the left side of the right-hand monitor with whatever I’m reading on the center display. When I’m using Bear to write or edit an article like this one I’ll move it over to the iMac (and often maximize it).
This sort of flexible approach means I need good tools for moving apps and arranging windows. I’ve used several different window managers over the years. My current favorite is Magnet. It’s just a quick key combination to move and size a window to cover the left or right half of the current monitor, maximize it to cover the whole display, or move it to the next monitor. I got a Magic Trackpad with this iMac, which has lead me to incorporate Better Touch Tool into my window management. I have it set up so a force press on the upper right or left corners of the trackpad will move the current window to the left or right monitor, respectively. A force press on the lower right or left corners moves the current window to that half of the current display. If I’m typing on the keyboard and need to move a window, I’ll use Magnet. If I’m using the trackpad, I’ll use Better Touch Tool.
Being able to have a ton of windows on the screen can be a huge productivity boost for some activities. For others it can be a huge distraction. To help combat the latter, I often use HazeOver. This app grays out everything on your screen(s) except for the current application. You can set how opaque you want this to be, all the way up to pitch black. I have it set to about 90%, which does a great job helping me concentrate on the task at hand when I need to.
Running a setup like this does have some implications for some of the OS’s built-in features. For many years I ran the dock on the side of my screen to save precious vertical screen real estate. With three widescreen monitors like this that would mean an awfully long trip to reach it, so I’m back to the default position at the bottom of my center display. Apple added the ability to jiggle your mouse back and forth to make the pointer expand so you could find it in El Capitan, but I never found the feature that useful until I had this much screen real estate to loose the cursor in.
I’m very happy with this three-monitor setup. The iMac display does most of the work, but the ability to have supporting apps to either side and apps I can glance at easily on the extreme ends is really nice, and helps with productivity.
July 17, 2017
Setting up a Mac
So far this year I’ve set up three different Macs: I had to “nuke and pave” both my MacBook Pro and Mac mini, and I bought a new iMac and set it up. Going through this three times has forced me to think about the best way to go about it.
Circumstances
There are several circumstances where you might have to set up a Mac from scratch. You buy a new Mac and need to set it up (yay!), you have some sort of failure and need to rebuild the machine to fix it (boo!), or you decide to voluntarily do the nuke and pave to give yourself a fresh start or eliminate the sort of cruft that builds up over time.
If you’re setting up a new Mac you’ve probably still got your old Mac, with access to all your data so you can easily copy things over, see what you have installed, etc. If you’re voluntarily reformatting your Mac, you can do some preparation ahead of time to back up your data and do things like make lists of installed apps. If your Mac went down hard and you have to reformat to get it working again, you have to rely on your backups.
As it happens, I have one example of each. I decided to do the nuke and pave on my MacBook Pro because reformatting the drive from scratch seemed to be the only way to delete a Boot Camp partition I wasn’t using anymore. My Mac mini had been suffering some glitches and finally got to a state where it wouldn’t even boot successfully. Finally, I got the new iMac and had to set it up.
There are ways of avoiding a lot of the setup work in all these circumstances. You can restore from backup or use Migration Assistant to move your apps and files to your new machine. However, I prefer to use these sorts of circumstances as an opportunity for a fresh start.
Reinstalling and setting up macOS
A new Mac comes with macOS already installed, of course, but if you’re rebuilding an existing machine you have to get the OS on there. The easiest way to do this is to boot into the recovery partition (hold down Command-R while your machine boots). Use Disk Utility to reformat the hard drive and then reinstall macOS on it.
Then it’s just a matter of going through the standard macOS setup process: creating a user account, entering your WiFi password, signing into iCloud etc. It will offer to transfer data from another machine, but when setting up from scratch I prefer to handle this myself so I only get the programs and data that I want.
One thing I always make sure to do during setup is to turn on FileVault disk encryption. This is a great security feature with no noticeable performance penalty on a modern Mac. The one place where you will notice it is if you turn it on later on a larger hard drive, as your machine goes through and encrypts all the data on the disk. Better to turn it on up front so that everything gets encrypted as soon as it’s loaded onto the machine.
Installing Apps
Once the OS is up and running, the next step is to load my apps. One of the big advantages of setting up from scratch is that it’s a chance to give some careful thought to which apps I want to install. There’s no need to install something had on my old machine, but didn’t really use, or only tried once. One strategy for this is to “install on demand”; to wait until you actually need an app before you install it. If I don’t need FinalCut for another six months, I can wait until then to put it on. The problem is this adds an extra layer of friction when I need to use an app for the first time on this machine. With a laptop, it’s also possible that I might be on a slow internet connection the first time I need to use an app. I prefer to install the apps I think I’ll need up front, but I’m not going to just blindly reinstall all the apps I had on my old machine. I’ll assess whether I really use an app and how likely I am to need it.
One thing worth thinking about is now just “what apps do I use?”, but “what apps do I need on this machine?” My Mac mini was running as a home server, handling backups, Plex, and Drobo. Since I had been having some trouble with it I deliberately installed only the bare minimum of apps for that role when I set it up again. No need to install apps like Pages or Ulysses when I’m never going to do any writing on this machine.
Priority Apps
Rather than just going in and starting to download stuff, I have a couple of priorities. Setting up a new computer will involve entering a lot of passwords, so I absolutely need 1Password. I got my copy form the App Store, so the first thing I’ll do is log in to the store and download 1Password (my iCloud password is one of the few I actually have memorized, so I can get into the App Store and into iCloud to sync my passwords).
Setting up a new Mac also involves lots of repetitive typing. I’m going to have to put my email address in a lot of different things to get this Mac up and running, so TextExpander is a must. I haven’t upgraded to their latest subscription based version yet, so I have to make sure to download the old version 4 (it’s still available, but it’s not very prominent on their website).
My TextExpander snippets are synced via Dropbox, so that’s my next stop. I’ve got a fairly big Dropbox folder, so the whole thing will take a while to sync. Rather than waiting on that, I use the selective sync settings to sync only the TextExpander folder at first, so it downloads right away. Once I have that, I’ll go back in and sync the rest of my stuff.
Finally, I am used to using window management software to the point where I find it painful to do without it (especially on Macs with large displays, like the iMac, or the external 24” I use with my MacBook Pro). Magnet is my current weapon of choice in this area, and it’s the next thing I download.
Other Apps
With the foundation in place, I start going through my list of purchased apps in the Mac App Store and downloading deciding for each one whether I wanted it on that particular Mac. Mostly this is a simple process of asking myself “how likely am I to need this app”. I did run into a few tricky situations where I had a Mac App Store version of an app, but then had a newer version outside the App Store (either because the developer stopped offering it in the App Store, or because I was able to get upgrade pricing by using the non-app store version). There were a couple of instances where I downloaded the old version from the App Store, then realized that I had a license for a newer, non-app store version.
After getting the App Store downloads going, I brought up 1Password and started going through the software licenses I have stored there. If I want an app on this machine I’ll go to the developer website and download the app from there.
Most of my apps are either in the App Store or have a license in 1Password. The trickier ones to remember are those that aren’t in either of those places. These are mostly free utilities of various types, or apps that go with particular pieces of hardware like my Drobo or ScanSnap.
Syncing Data
The advent of cloud services has made setting a computer up from scratch much easier than it was in the past. Most of my data automatically gets synced over to my new machine without much action on my part.
The vast majority of my data lives in Dropbox, that’s taken care of already. I keep my photo library in iCloud, but I like having a local copy on my machine. I’ll launch the Photos app and tell it to start downloading my pictures. I keep a few documents for my OmniGroup applications in their OmniPresence cloud storage system, so I’ll download the OmniPresence client and get those synced over.
There is some data I prefer not to keep in the cloud (tax returns and the like). I fire up my old Mac or connect a clone backup of the old hard drive and copy these things over from my Documents folder.
The tricky bit are the important bits of data that don’t live in the cloud or in my Documents folder. Things like Hazel actions and Automator scripts. Hazel in particular is a bit tricky since it really prefers that you export your actions on the old computer and then import them on the new one. When the old Hazel installation just got paved over that’s kind of hard. In one instance I ended up booting my MacBook Pro from a clone backup so I could launch Hazel and export all my actions.
Backing Up
Given how important my backups were when I had to unexpectedly repave my Mac mini, getting things backed up is a priority. Going through my whole backup strategy is an article in and of itself, but I’ll lay out my backup priorities with a newly set-up Mac.
Step one is Time Machine. This is the easy button when it comes to backing up a Mac and it’s a good first step.
Next up is my online backup service, Backblaze. They have a neat feature called “inherit backup state” where you can just point your computer at an existing online backup. This is great if you have lots of data already backed up in the cloud. Unfortunately, I found it a bit hit or miss. When I reformatted my Mac mini it didn’t work, so I had to start the process of uploading all my data to the cloud from scratch. It did work fine on my MacBook Pro, and I was able to point the new iMac and the Mac mini’s backup.
The last step is to clone the hard drive to an external disk. The key here is not to immediately reuse the same disk you were backing up to before. Keep that one on the shelf for at least a couple of months. You’re likely to run in to some bit of data that you need and forgot to transfer over during this process. Hard drives are cheap, pick up a new one.
Conclusion
Setting up a Mac from scratch is a bit of work, but it’s a good thing to do every once in a while. It’s an opportunity to get rid of some cruft and rethink how I do things. I figure if I do it right, the time I spend will pay dividends down the line.
July 3, 2017
First Impressions of the new 2017 5K iMac
I am now the proud owner of a brand spanking new iMac!
What I got
This is the first time that I’ve bought an iMac (or any all-in-one desktop). Before I’ve always had desktop machines with separate monitors. Since such a big portion of the value of this computer is in the screen I ordered a fairly high-end machine so that hopefully I’ll be happy with it as long as possible.
Apple offers their usual three “good, better, best” configurations on their website. The higher end configurations have slightly better processors and the “best” machine has more storage; they also have three different graphics cards. Notably, starting with the higher base model is the only way to get better graphics on this machine; you can’t configure the GPU separately.
I started with the “best” configuration and bumped the processor up to an i7 (better multithreading and a faster clock speed). Unlike a lot of Macs, the memory in the 27” iMac is user replaceable rather than being soldered to the motherboard. With non-upgradable machines I tend to max out the RAM when I buy it, since there’s no way to add more later. In this case, I bumped it up to 16gb, but if I feel the need in the future I’ll be able to upgrade it all the way up to 64gb (and do so for a lot less than the $1200 Apple would charge me).
The other big upgrade I made was getting a 1tb SSD. I fell in love with SSDs when I bought my bought my current MacBook Pro back in 2012. After using it for a while anything with a spinning hard disk just seems soooo slooooow. The other storage option on this machine is a Fusion Drive (a spinning disk plus a small SSD for cacheing frequently used data). While the Fusion Drive mitigates some of the disadvantages of the spinning disk, I’m willing to spend the extra $$$ to have fast access to all the data on my machine. However, I decided it didn’t make sense to spend $1400 for a 2tb SSD. I keep the really big stuff like my iTunes and Plex libraries on a network attached Drobo. The drive in my computer is basically apps, my photo library, and dropbox, plus whatever larger files I’m working on at the time. Honestly, right now I could probably get by with a 512mb SSD (the one in my MacBook Pro has been doing fine) but since the SSD is not easily replaceable, I figure 1tb will help future-proof this machine.
First Impressions
Out of the box my first reactions was “wow, this is big”. I’ve run a 27” monitor at work, so the size really shouldn’t have been a surprise. However, unlike a monitor the “chin” beneath the screen adds considerably to the impression when you’re sitting in front of it. It also makes the machine fairly tall. I like my monitors elevated fairly high; I’ve been running the monitors on my desk at home on a 10” tall monitor shelf for a long time. In this case, however, putting the iMac on the shelf made it way too high. The shelf had to go. For now I’m using a few reams of paper and a book, putting the bottom of the iMac’s “foot” about 7” above the desk. This puts the screen in the proper ergonomic position (with my eye level just below the top of the screen).
The big 5k screen is just fantastic. I am completely blow away by how bright and sharp it is. I’ve had retina displays on my laptop and iOS devices for years now, but thanks to it’s size this is just in a whole different category. It’s also tremendously bright. I’ve got it on the middle brightness setting and it’s still brighter than the 24” monitor I have next to it, even with the brightness on the external monitor cranked all the way up.
Lots of people say that once you’re used to a retina display you won’t be able to stand a non-retina screen, but in the past I hadn’t found this to be true. My retina MacBook Pro spent most of it’s lifetime right next to a standard definition 24” external display. If you looked hard, it was obvious the laptop screen was better, but I didn’t think it really made the external monitor look bad. Putting that same 24” display next to the iMac made it look horrible by comparison. I had been planning to get a pair of 4k monitors to go with the iMac, but seeing just how bad the standard def display looked definitely made that more of a priority.
This is a very fast machine. Not that my MacBook Pro was pokey by any means, but the difference is quite noticeable. While the processor and memory are both substantially faster, I think the faster SSD is a big contributor to the perceived increase in speed. Going from the SATA connected SSD in my MacBook Pro to the PCIe connected drive in the iMac isn’t as big a difference as going from a spinning disk to an SSD, but it takes a lot of things that were short waits on my MacBook Pro and makes them effectively instantaneous. Stuff that took a long time is noticeably quicker: for instance, when I run DaisyDisk on my iMac’s SSD it runs in a fraction of the time that it takes on my MacBook Pro.
I haven’t had a chance to do a lot of real processor intensive stuff, but it’s no slouch in that department either. The iMac cranked through the photo recognition on my large Photos library quicker and with less disruption to my other work than on older machines.
So far, the only games I’ve played on the iMac are Civilization VI and Kerbal Space Program, neither of which are graphics hogs even with all the settings maxed out. The GPU in this machine is mid-range by PC standards, but in these games it’s just loafing along.
I also got the new Magic Keyboard with Numeric Keypad (the numeric keyboard option is new). Normally I’m a click-clacky mechanical switch keyboard guy. The Magic Keyboard is similar to the keyboard in my MacBook Pro, with much less key travel (though still more than the recent MacBook and MacBook Pro keyboards). I’m giving it a try, but I’m not sold yet. I may end up going back to my big, wired keyboard. One minor annoyance is that the Magic Keyboard doesn’t have the double-height “+” key that I’m used to, so the “-“, “*”, and “/“ keys are each one position off from where my fingers think they should be.
Another feature I really like that’s new to me is the ability to unlock the Mac with my Apple Watch. This actually came out last fall as part of macOS Sierra, but my MacBook Pro was too old to take advantage of it. It’s probably a bit faster than typing in my password, but not by a huge amount. I’d still really like a desktop keyboard with a TouchID sensor (that might be enough to get me to give up my mechanical switch keyboard for good).
Overall, I’m very happy with the new iMac. The speed and the big, gorgeous screen are a big upgrade from my 5-year old MacBook Pro. I’m also happy to have a dedicated desktop machine. As I said in an earlier article, for my current circumstances having a desktop at home and a laptop (or, increasingly, an iPad Pro) that I can take to work or on the road makes more sense than doing everything on a big beefy laptop. I’m looking forward to many years of enjoyment from this machine.
June 19, 2017
Laptop vs. Desktop
For most of my computing life, I was a desktop and laptop person. A desktop machine at home for heavy duty tasks and gaming, and a laptop for presentations and getting work done on the go. This pattern survived my transition from Windows PCs to Mac, where I ultimately ended up with a Mac Mini and a first generation MacBook Air.
Then about 5 years ago I got a job where I needed a beefy machine at work to do video editing and photo manipulation. Rather than spending the cash to keep both a desktop and a laptop up to date, I decided to go with one powerful laptop and move it back and forth from home to work. At the time, the Retina MacBook Pro had just came out, and I ended up going with a top of the line 15” model. I got a couple of external displays to satisfy my passion for screen real estate and was good to go.
I did not go entirely laptop-only, however. Although my Mac Mini had been eclipsed by the MacBook Pro as my primary computer, I kept around as a home server, running my iTunes library, handling online backups, and other tasks. This helped me retain the advantages of having a desktop at home without the expense of keeping up with new hardware (who cares if it’s slow when I only log in once every couple of months).
I love the 15” Retina MBP and that machine is still going strong today. However, my circumstances have changed. I no longer do a lot of heavy duty tasks on my Mac at work; rather than editing movies and photos, the most stressful thing I’m doing is some light Python scripting. On the flip side, the 5 year old MacBook Pro and Mac Mini are getting rather long in the tooth for some of my needs at home. The MBP isn’t able to run some of the games that I’d like to play and the Mini has started getting a bit flaky.
All of this lead me to decide that my next Mac would be a desktop machine; I settled on one of those big, beautiful 5k iMacs. I actually made this decision late last year, but since the then-current iMac was over a year old at that point and lacked USB-C or Thunderbolt 3, I decided to wait and hope for an updated model. I was hoping for new Mac desktops at their November event, but when that brought only new MacBook Pros, I feared it would probably be Fall 2017 before we saw any new iMac models. Then WWDC 2017 brought an unexpected gift: new iMacs with USB-C and Thunderbolt 3 support! I jumped on the opportunity right away and now I’ve got a new top of the line 5K iMac on the way. I expect I’ll have plenty more to say about this machine when it arrives.
For now, my old MacBook Pro soldiers on in the laptop role. I still tote it to work every day. It’s under threat from a couple of different sides, however. Since I no longer need a ton computing horsepower in a laptop, I’m tempted by the ultralight MacBook. The touchbar has me drooling over the new MacBook Pro as well, and the 13” model would still be quite a bit smaller and lighter than my current MBP. The biggest threat may not be a new laptop at all, however. The 12.9” iPad Pro has already replaced my laptop more and more often when I travel, and with the new enhancements to iOS that were recently previewed at WWDC, I can foresee it taking on a larger and larger role in my life. Perhaps the next phase for me is a beefy desktop at home and an iPad everywhere else?
June 12, 2017
Due and Time Sensitive Tasks
Fourth in a series on task management. Read part 1, part 2, and part 3.
OmniFocus is a great tool for capturing and organizing tasks, but when it comes to getting certain stuff done I need a bit more of a kick in the pants. That’s where Due comes in.
Due is a very persistent reminders app. By default it will sound an alert not only at the date and time you set for the task, but every five minutes thereafter. It’s great for things that need to get done at a certain time, like taking the trash can out to the curb on trash day.
While you can use it for one-off tasks, most of the stuff I’ve got in there are repeating tasks. Due has a very powerful system for this that goes beyond just the daily and weekly repeats you see in other apps. It allows you to set a task to repeat on a certain day of each month, or just on weekdays, etc. The only repeat interval I think is missing is one for a certain number of days before the end of the month (which would be useful for things like mailing my rent check that needs to arrive by the 1st of the following month).
I use Due for things like reminding myself to back up my iOS devices to a Mac every week, to top off the charge on a USB battery pack every month, and even to call my parents on their birthdays. One of the most critical things I have in there is a reminder to do my weekly GTD review in OmniFocus. I have a tendency to skip that, so it’s great to have an app as persistent as Due to get me to do it.
Due is a great looking and well designed app on iOS. The Mac version is not nearly as impressive (and has a completely different look). It basically seems kind of phoned in on the Mac, the iOS version is definitely the flagship. I’ve got it installed on my laptop just so I get the reminders, but I don’t usually interact with it much on the Mac (the reminders sync back and forth via iCloud or Dropbox).
May 8, 2017