I’ve been a longtime listener of the Mac Power Users podcast. I started listening about nine years ago and haven’t missed an episode since.
Recently, co-host Katie Floyd left the podcast and was replaced by Stephen Hackett, one of the founders of Relay FM. Among his many other titles, Stephen is Relay’s Senior Vice President of Live Events, and it didn’t take him long to bring that expertise to Mac Power Users.
When I saw that MPU would record a show live in front of an audience in Chicago in early March, I jumped at the chance. I was able to grab one of the tickets that included not only the show itself but a meet and greet with Stephen and David Sparks after the event.
As much as I like MPU, flying to Chicago just for a few hours seemed like a bit of a waste, so I decided to make a full weekend out of it. I love museums, and the Museum of Science and Industry and the Field Museum of Natural History are two of my favorites. I visited both many times when my grandparents lived in the Chicago suburbs, but I haven’t been to either in over a decade. The two museums and the recording of MPU would make a nice weekend trip.
Friday
One of the nice things about Chicago is that it’s one of the few cities I can get a direct flight to from Wichita. I was able to fly out late Friday afternoon.
Saturday
I spent the day on Saturday at the Museum of Science and Industry. It’s changed quite a bit since I was last there and it’s a very interesting museum. I went all out and took the tours of their coal mine mockup and U-505, a captured German submarine. Despite spending the entire day there, I wasn’t quite able to see everything.
Over at the Mac Power Users forum, some folks arranged to meet for dinner before the show. We rendezvoused at an Apple Store near the venue and to a nearby Mexican restaurant.1 It was great spending some time talking to fellow MPU listeners.
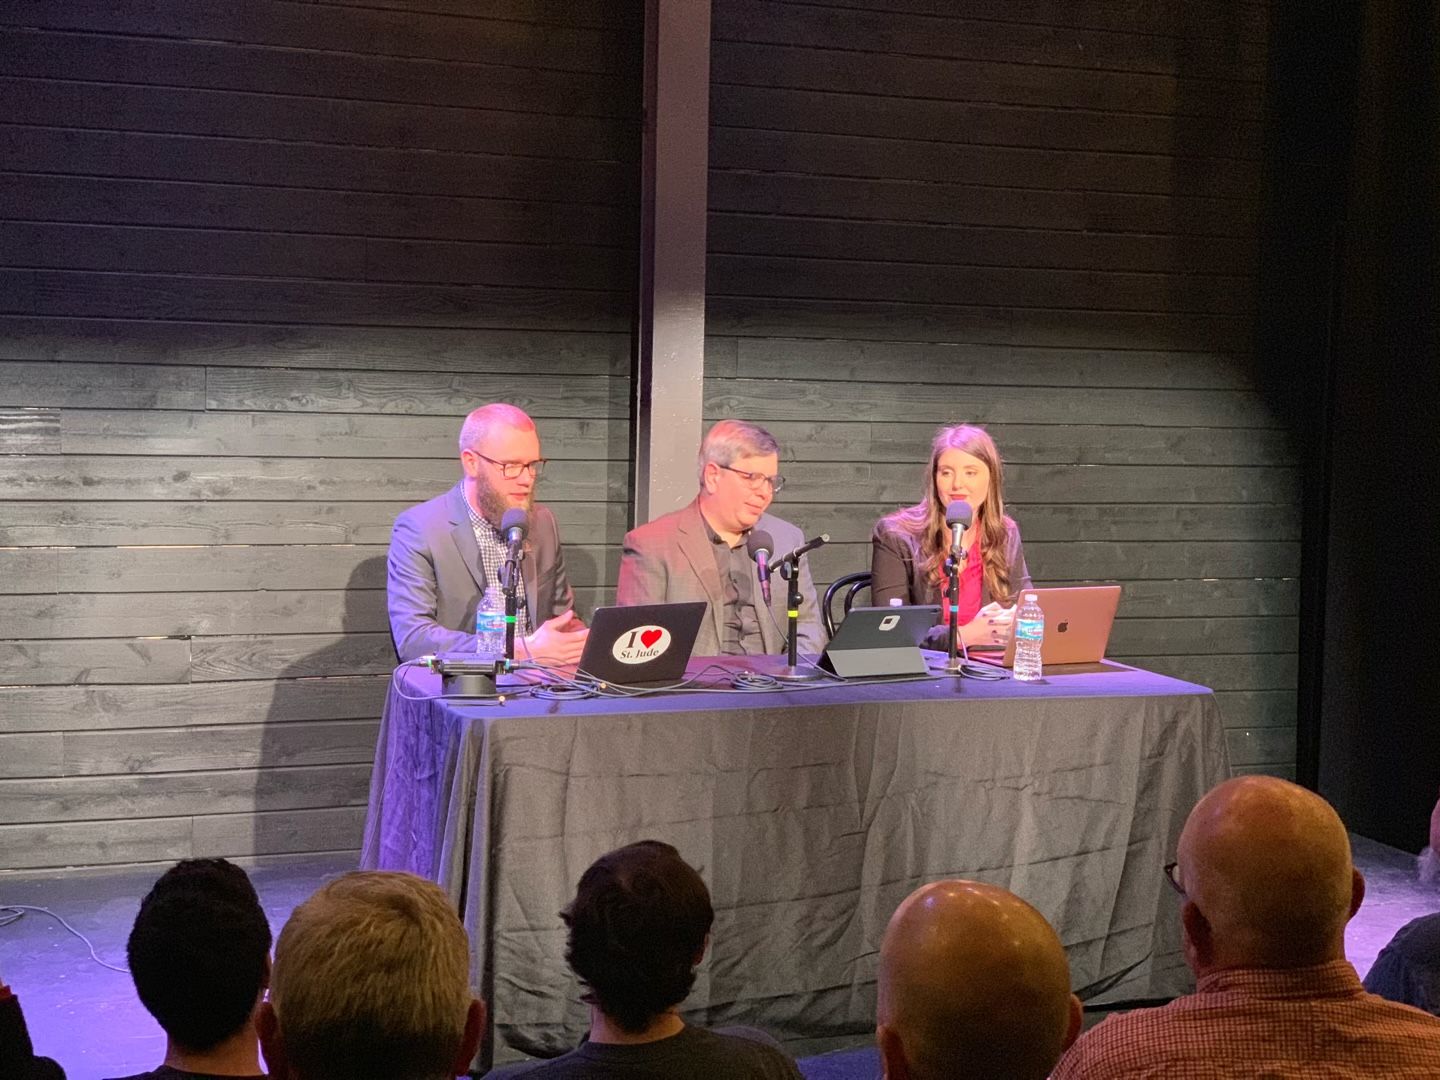
MPU Live!
We headed over to the venue and got there just before the doors opened at 7pm. Before the show, I had a chance to talk with Focused co-host Mike Schmitz, as well as recent Focused guest Chris Bailey.
Three microphones
One that was obvious as soon as we entered the theater was that there were three microphones up on stage. This lead to some speculation about who might be guesting on the live show.
David and Stephen
Things got rolling about 7:30 as David Sparks and Stephen Hackett came out (to much applause). After some discussion of David’s misadventures with a missing Documents folder on his iMac Pro, they were joined by Rose Orchard (co-host of Automators. She and Stephen discussed the new MacBook Air, which they both seem to like quite a bit.
David, Stephen, and Rose
Rose was not the only special guest though. After the discussion of the Air, they brought out Mike Hurley, co-founder of Relay FM.
David, Stephen, and Myke
Getting two guests to take transatlantic flights to appear at your live podcast recording is pretty impressive, and seeing Myke and Rose was a real treat.
The rest of the show just flew by. Afterward, folks who scored the “VIP” tickets (about half the audience) got to hang around for a meet and greet. David, Stephen, Rose, and Mike put in a lot of time talking to folks (it seemed like David, in particular, was really enjoying it).
In addition to the hosts and guest, there was a selection of other podcasters/bloggers in the audience as well. Beyond the aforementioned Mike Schmitz and Chris Bailey, I also had a chance to talk with Mike Potter, organizer Macstock. Talking to him has me pretty excited about going to Macstock for the first time in July (I’d bought a ticket even before they announced that Mac Power Users episode 500 would be recorded live at the conference). I didn’t even get a chance to talk to Alex Cox of Supercomputer or John Voorhees of MacStories.
But beyond the big names, I enjoyed the opportunity to talk with fellow Mac Power Users listeners. It’s always good to get a chance to share some fellowship with folks who have common interests.
All told it was quite late by the time I headed out and about midnight when I got back to the hotel.
Sunday
On Sunday I spent the day at the Field Museum of Natural History. It, too, has quite a few new exhibits from the last time I was there. However, I do remember some that date back to my previous visit a decade or so ago. The new exhibits include an excellent dinosaur exhibition and some good touring exhibits on mummies (both Peruvian and Egyptian) and ancient China.
After a nice dinner at a local English style pub, I headed out to O’Hare for my late flight home. At the airport I found my flight had been delayed even later. Then back in Wichita the temperature was in the single digits, and I wasn’t able to get my car started. I finally took an Uber, arriving home about 2am.
Concluding Thoughts
Save for the last minute issue with my car, this was a great trip. Going to a live Mac Power Users recording was a fantastic experience. I’m very happy that I took the plunge and decided to come. The recording itself was pretty neat, but the real highlight was the chance to talk with David, Stephen, Rose, and a lot of fellow Mac Power Users listeners. This really has me looking forward to coming back to Chicago for Macstock this summer.
Going to Chicago of all places for Mexican food does seem a little odd, but it was pretty good (even with my standards for good Mexican food calibrated by growing up in Arizona). ↩︎
One of the questions that have occupied me recently is whether an iPad Pro can replace my Mac laptop.1 One of the ways I justified spending a lot of money on one of the new 2018 iPad Pros was that it would help me avoid replacing my even more expensive MacBook Pro. I’ve already concluded that the iPad Pro is a workable replacement for my MacBook Pro as my travel machine. I’ve taken several long work trips with just the iPad and gotten by just fine.
The other role that the MacBook has long served is as my workplace Mac. For many years I’ve had one of my personally owned Macs on my desk next to my employer-issued PC.2 There’s some specialized software I use for work that’s Windows only, but for lots of general tasks like writing, outlining, and task management I prefer Mac/iPad apps.
Federico Viticci’s article on the many setups of his 2018 iPad Pro got me wondering whether the iPad Pro could replace my MacBook Pro on my desk at work. A lot of “can an iPad replace my Mac?” questions really boil down to “what software do you use?” In this case, software is not the problem. My work Mac is primarily used for writing text files (currently using iA Writer), managing tasks using OmniFocus, and browsing the web in Safari. I’ll also manage email in Spark or Apple Mail and occasionally outline things in OmniOutliner. All of these have iOS equivalents.3 Basically, anything I can’t do on the iPad is stuff I’d be doing on the PC anyway.
So for me, the question of whether the iPad Pro could replace my work Mac was not one of software, but ergonomics. I find it very uncomfortable to spend an extended period working on an iPad in the Apple Smart Keyboard or any 3rd party stand that puts the iPad in a similar position. I always end up with a crick in my neck. Laptops are just as bad, which is why I always used my MacBook Pro with an external display whenever I was at my desk. Federico’s article got me wondering if I could do the same with my iPad Pro.
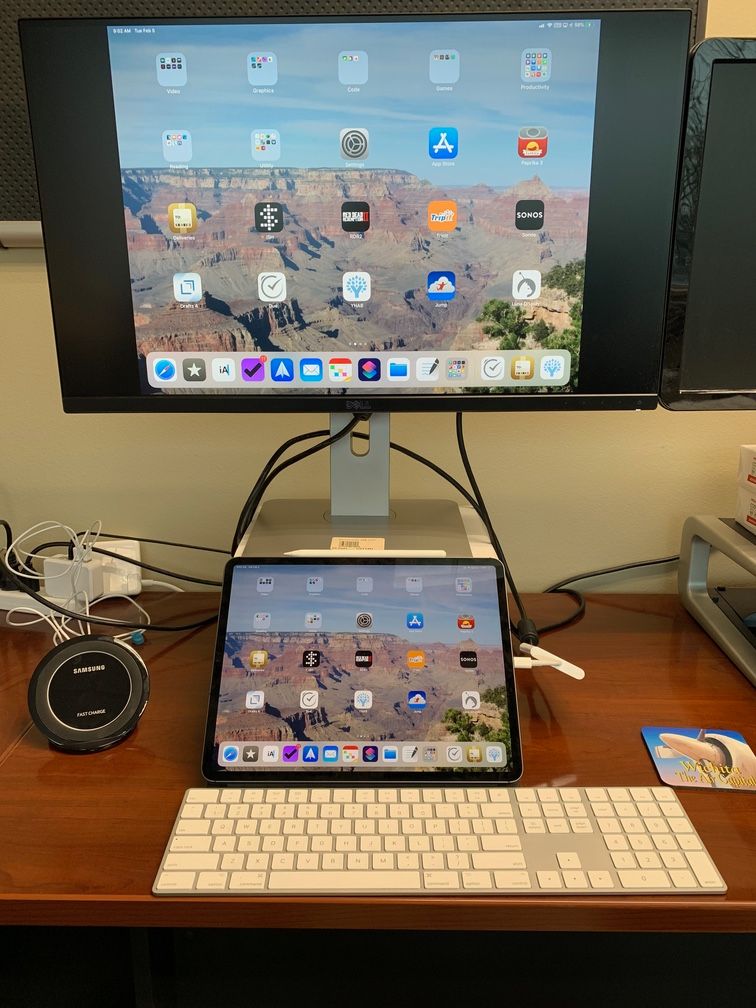
My setup
My first obstacle was finding a suitable external display to test this with. I started with an old 19″ Dell monitor that had been hooked up to my work PC. Not only was it easily available, but the 4:3 aspect ratio meant that unlike a widescreen monitor the iPad output wouldn’t be pillarboxed.4 Unfortunately, the iPad looked terrible on it. Not just “this obviously isn’t retina,” but blurry enough that I’d get a headache if I used it for any significant length of time. A 24″ HD monitor suffered the same issues. The iPad looked great on one of the 24″ 4K monitors I had hooked up to my iMac at home, but I didn’t want to bring one of them in to work. Eventually, I tried it on a Dell 27″ U2719D that’s usually attached to the work PC. It’s not 4K, but it’s 2560x1440, which is somewhere between a standard definition monitor and retina. On it, the iPad’s output was clear and sharp. As is my usual practice, I used several reams of paper to get the monitor up to a higher elevation.
I connected the iPad using the Apple HDMI adapter that I bought to use for presentations. It has pass-through charging, so my iPad gets charged as well as connecting it to the monitor.
To hold the iPad, I used an Elevation Lab DraftTable stand. This stand is big, heavy, and rock solid. I’m running it in the highest position, which holds the iPad at about a 45° angle. I started off with it off to the left of my keyboard (I’m left handed), but I quickly found that centered underneath the monitor worked much better for me.
Speaking of the keyboard, I used the same Bluetooth Apple Magic Keyboard with the numeric keypad that I’d been using with my Mac at work. It works fine, but if I decide to go with a setup like this over the long term, I’ll probably switch to something different. For one thing, I’m a mechanical keyboard guy. I like clicky switches and lots of travel. For another, I think Bluetooth is actually a disadvantage in this role. The problem with a Bluetooth keyboard is that if I disconnect the monitor and want to use the iPad in tablet mode, it retains the connection to the keyboard so the on-screen keyboard won’t come up when I need to type. Several times I’ve had to turn off Bluetooth in order to type on the iPad. It would be better to have a wired keyboard plugged into the same hub as the monitor. That way disconnecting the monitor would disconnect the keyboard as well.
The experience
Using the iPad with an external monitor is a bit of an odd experience. It’s not the same as using a laptop with an external display because the iPad’s touch interface still requires direct manipulation. This means dividing my attention between the monitor and the iPad. When I’m reading or typing, I can look at the external monitor, but if I need to tap or swipe I have to glance down to make sure I hit the right touch targets. Glancing down is not really a problem, but I do find that I sometimes forget to look back up and end up just using the iPad screen rather than the external display. While I can still use the iPad that way, it kind of negates the ergonomic benefits of using an external monitor.
Contrast this to using macOS on a laptop. Because the trackpad manipulates the screen indirectly, there’s not the same requirement to look at the laptop screen rather than the external monitor. Trying this configuration does have me hoping that Apple will add some sort of pointing device support to iOS, though I don’t know how likely that is in the short term.
FaceID works fine in this configuration. In fact, if anything it reinforces how much better having FaceID makes iOS. Rather than having to type my master password into 1Password, all I have to do is glance down at the iPad and my password will get filled in. I really can’t wait until FaceID comes to the Mac.
Conclusions
When I started this experiment to make sure I gave the iPad with the external display a fair shake I vowed that I would do everything I possibly could on the iPad and use my Mac at work as little as possible. Since the beginning of January, the only thing I’ve used my Mac to do at work is to make some changes to a Gantt chart I made in Typora.5 Other than that, the only reason I’ve booted up my MacBook Pro has been to do maintenance tasks on it (to run backups and software updates).
That said, the fact that this sits right next to my work-issued PC does provide a bit of a safety valve. I may have done a bit more on Windows in the past month than I would have if I’d been using the Mac rather than the iPad (particularly when I need to tweak a Word document or PowerPoint).
Overall, I think this has been a successful experiment. I clearly can get by with the iPad Pro and PC at work. That said I don’t know if I’m entirely sold on the iPad plus an external display. Dividing my attention between the iPad and the monitor is kind of awkward, and I’ll often find my attention captured by the iPad and forget to look back up at the display, negating the benefits of having the external monitor. It tends to work best for reading and typing, less well for anything requiring more sophisticated touch manipulation.
That kind of leaves me in limbo. If I were to commit to this configuration, I’d want to buy another external monitor for the purpose so I could move the 27″ back to my work PC.6 I don’t know if I’m quite ready to go that route though. For the moment I’m trying a tall iPad stand so I can see if elevating the iPad itself on a stand is a better ergonomic solution for me than an external monitor.
Most often this has been my MacBook Pro, but at times my late Mac mini has filled that role as well. ↩︎
Having both Mac and iOS versions is getting to be a hard and fast requirement for me to adopt an app these days. ↩︎
Pillarboxing is when there are black bars on either side of the display when you display 4:3 content on a widescreen monitor. ↩︎
Typora lets you create Gantt charts in Markdown, which is a bit fiddly but I found worked better for me than any other software I tried. I use it seldom enough that I could just use Remote Desktop to access my Mac when I need to update this Gantt chart, but I really ought to find a Gantt application I like on the iPad. ↩︎
Ideally a USB-C monitor so I could have a single cable connection ↩︎
I recently replaced my Drobo NAS with a Mac mini. The initial impetus for this came from the fact that my Drobo was running low on space. All of the drive bays were full, so I couldn’t just throw another drive into the machine. This was not an insurmountable problem; these were mostly old 3tb drives, so I could have just replaced a couple of them with newer, larger drives and had plenty of space. However, it got me thinking about what I wanted out of a NAS and whether the Drobo was really the best way to fill that need.
The Drobo/home server fills a couple of roles for me. Primarily, it’s a big pot of storage where I can throw large files that I don’t need to access frequently and take up a lot of room on the primary drives of my computers. It also stores my Plex and iTunes media libraries, making them available over the network to any device in the house.
For the most part, the Drobo has served me well over the past six years, but there are definitely some downsides to using a NAS rather than having direct access to your data from a computer. Network shares aren’t always mounted when you want them to be.1 Certain things are much slower or less reliable when doing them over the network.2
For quite a while I’d assumed that when I eventually replaced my Drobo, I’d get a Synology NAS. However, I realized that many of my issues were with network attached storage in general, rather than the Drobo in particular. While a Mac mini was more expensive than a Synology, I could also reuse some external hard drives I already had on hand rather than having to buy new drives to populate the Synology, meaning a Mac mini would actually be a bit cheaper up front.
Hardware
I had been planning to initially try this out with an old mid-2011 Mac mini, but the old mini gave up the ghost just as I was getting started with this project. So I went ahead and bought one of the new 2018 minis.
For the home server role, I probably could have gotten by just fine with the base model. However, one of the great things about the Mac mini is how flexible it is. My 2011 mini has, at various times, been my main home desktop, a headless server, and a secondary desktop machine at work. I thought the base model might be too limited if I even wanted to use it as a desktop. In order to future proof this machine a bit I bought the higher-end configuration with a 6-core i5 processor and a 256GB hard drive. I did stick with the stock 8GB of RAM, but that can be upgraded in the future (albeit with some difficulty).
It’s not really very consequential in the grand scheme of things, but I do like the space gray color. I think it suits the mini rather well.
Display
The mini runs headless, without a display attached.3 As a server, it trundles along without my intervention most of the time, but I do need to get on it occasionally. I’m using Jump Desktop4 to provide remote access. It allows me to log in to the mini from anywhere using an application on my iMac or iPad.
However, the most common way for me to access the mini when I’m at home is using Luna Display. Luna is a hardware dongle that plugs into your Mac and lets you use an iPad as an external display. While the original use case mostly focused around using the iPad as a second display for a laptop to get more screen real estate the release of the 2018 Mac mini created a lot of interest in using Luna and the iPad as the primary display. This is how I’m using it. Unlike Jump Desktop, this only works when I’m on my home network. However, Luna is a lot faster, less laggy, and has better resolution than a remote desktop app. It really is like having a screen plugged right into the mini.
Luna Display also allows you to use the touchscreen to manipulate the macOS interface on the mini. This is a two-edged sword. While it’s convenient, it also makes clear why Apple has resisted adding a touchscreen to Mac laptops. Many of the touch targets are just way too small.5 The Apple Pencil helps with this since it’s a lot more accurate than my big fat fingers. I’ll often grab it off the top of the iPad when I need to minimize a window (don’t want to accidentally hit the red button instead of the yellow button) or another similarly precise task. Scrolling and right-clicking are a bit troublesome as well. However, the most significant limitation is probably that with Luna display you can only enter text on the remote computer if you’re running an external keyboard. It won’t bring up the software keyboard on the iPad. My iPad Pro spends so much time I the Smart Keyboard Folio that this isn’t really an issue for me.
Software
I gave serious thought to running the mini very stripped down as far as software goes, but in the end, I decided to install my usual suite of apps. A big reason for this is, so I have the option to use Jump Desktop on my iPad to log in remotely when I’m on the road without a laptop. Having this option is a nice safety blanket that makes it easier to leave the laptop at home and go iPad only when I travel. It also means that if my iMac were to go down the mini is all set up to take over right away as my primary desktop.
Backup
One of the critical tasks for a home server is keeping everything backed up. A real advantage of the Mac mini over Drobo is that Backblaze will back up directly attached external hard drives but not network drives.6 A disadvantage is that I no longer have the built-in redundancy in the event of a drive failure that the Drobo provides. Instead, my data gets backed up from my two main external drives to another pair of external drives every night. Combined with weekly backups to “shelf” hard drives that don’t stay connected to my machine, I’m feeling pretty good about my backup.7
Printing
I’ve taken this opportunity to move my printer into the spare room where the mini lives. I print seldom enough that I don’t really need to have the printer within arms’ reach all the time. It’s shared over the network so I can still print from my iMac, and using Printer Pro I can send stuff to it from my iPad as well.8
Concluding Thoughts
I’m very happy with my decision to ditch the Drobo and use a Mac mini as my home server. Having my data on a machine that I can log into directly rather than just a network share makes lots of things simpler and faster. It gives me options that I just didn’t have with a Drobo, particularly when it comes to remote access.
The new mini is a very slick machine. It’s been fast and responsive and has handled the fairly heavy load copying data off my Drobo and doing initial backups to cloud services. I’m really glad that Apple decided to update the mini and keep it in the lineup.
Especially a problem for things like scheduled backups that happen when I’m not sitting in front of the computer ↩︎
iMazing backups of iOS devices seem to work much better when the destination is on a local drive than a network share, for instance. ↩︎
I used the USB-C to VGA adapter I bought for my iPad to temporarily connect the mini to an old display to get things up and running. ↩︎
I also tried out Screens, but ended up settling on Jump Desktop for my remote access needs. ↩︎
Jump Desktop for iOS has some affordances for this, including different mouse pointer modes and support for specific models of Bluetooth mice. ↩︎
I had a workaround for this (clone the Drobo to an external drive attached to the iMac), but it was kind of kludgy and meant the data on the Drobo only got backed up to the cloud once a week. ↩︎
Much more on my backup strategy can be found here. ↩︎
I’ve been using the new 12.9″ iPad Pro for a few months now, and I thought it was time to update my first impressions. Overall, it’s probably my favorite (and most used) Apple device right now.
A smaller big iPad
Compared to my previous 1st generation 12.9″ iPad Pro the smaller overall size is really noticeable. The new 12.9″ is much nicer to use in the hand as a tablet (as opposed to in a stand on a desk). The reduced size and weight mean it’s also easier to carry around. I’m finding that I tend to bring it with me more often than my old 12.9″. Some of this difference may be down to the excellent Sutter Tech Sling that I got at the same time as the new iPad Pro, but the smaller size and lighter weight of the iPad itself plays a role too.
Face ID
Much like my experience going to the iPhone XS from an iPhone 7, FaceID is really the headline feature. If anything it’s even better on the iPad. It works in any orientation, and I mean any. Not just the four cardinal directions, but even when holding the iPad at an angle.
The one annoyance with Face ID is that I sometimes wind up covering the camera with my hand. This is a particular issue for me as a left-hander since, in landscape mode with the pencil charger at the top, the camera is on the left. I wish Apple had just made this a landscape mode device and put the camera in the bezel of one of the longer sides. One thing I like is that when FaceID fails the iPad definitely does a better job than the iPhone telling you why it failed (usually it’s either distance or having my hand over the sensor).
Combined with the ability to double tap the keyboard1 to wake and unlock the device, FaceID makes the iPad the device I’m most likely to use when I need to hop on for a quick task.
Keyboard
I really like the Smart Keyboard Folio. I think it’s the best keyboard that Apple makes at the moment (though that may be damning by faint praise). While there’s nothing like a mechanical switch keyboard with lots of key travel, for a low-travel portable keyboard I think the Smart Keyboard Folio is quite good. While it is thicker than the old Smart Keyboard, it makes a much more solid stand. I think the fact that it’s the same thickness across the entire surface is an aesthetic improvement over the “thin part/thick part” design of the older model. However, the multiple angle options don’t really do much for me. I never really use the more upright angle; it’s just too steep.
Pencil
While I still use the keyboard the majority of the time, I’m getting far more use out of the new Apple Pencil then I ever did out of the old one. The old pencil was always buried amid all the clutter on my desk or stowed away in a bag somewhere, not worth getting out unless I had a big “Pencil job.” Now, I make a point of grabbing the pencil every time I get the iPad out of my bag so that when I’m using it, the new pencil is always right there, magnetically attached to the top of the iPad. That’s the real game changer.
I’ve found myself using the new pencil quite a bit when editing text (which I have always felt was a weak point of iOS). With the pencil I can double tap with the pencil to select a word, then use it to drag the blue dots at the end of the selection much more precisely than I can with my finger. It also allows much more precise placement when dragging and dropping text or images.
I’m also using the pencil quite a bit for taking handwritten notes. I started out doing this in the Apple Notes app, but I think I’ve settled on GoodNotes for this role. While writing on glass doesn’t feel the same as using a pen and paper, it works well enough and the advantages of having my notes digitized from the get-go and not having to worry about filing them or finding them again later more than make up for that.
Display, battery, and USB-C
The display is excellent, but I can’t say I really notice improvements from my old iPad Pro like True Tone and Pro Motion in regular use. There are still some apps that haven’t gotten with the program and updated for the new resolutions, so they still display with a black border around them. It’s pretty seamless (just looks like the bezels are a bit thicker), but it annoys me that I’m not getting full use out of this display.
Battery life is excellent. I used the iPad Pro for notetaking at a conference last month, and despite heavy use, I really did get all day battery life out of it. Using chargers that support USB-C power delivery tops the battery off quite quickly.
USB-C on the iPad is still a story of unrealized potential. At this point, I’m not really using it for anything that I couldn’t have done with Lightning with the right set of dongles and cables. Even the quick charging was something I was doing using a USB-C to Lightning cable with my old iPad Pro. I really hope we get support for things like external storage in the next version of iOS.
The best iPad yet
If you just look at specs on the page, it doesn’t seem like the 2018 12.9” iPad Pro should be all that big a jump from the 1st generation 12.9”. It’s slightly smaller, swaps Touch ID for Face ID, and it gets a faster processor and a place to charge your Apple Pencil. In practice, I’ve found that the new iPad Pro is a significantly better device, one that’s changed how I use my iPad and how I divide different computing tasks among my various devices. I’m nowhere near ready to give up my Mac, but I do find I’m not using it as much lately, and that’s largely thanks to the new iPad Pro.
This sometimes gets described as “double tap the spacebar to wake,” but you can do it with any key. ↩︎
In the past few years I’d been doing most of my writing in a combination of Bear and Ulysses. Bear for note taking and shorter form stuff; Ulysses for long form writing. Both these apps worked well for me individually, but even though I had drawn a pretty clear line between them having two different writing environments did introduce a bit of friction. There are also a few things about Ulysses in particular that rubbed me the wrong way. I dislike the non-standard way it handles Markdown links, for example.
In late 2018 I decided to give iA Writer a try. I picked iA Writer in part because of some of the things Federico Viticci has written about it. I liked the idea of an editor that stores files in iCloud Drive and plays nicely with iOS features like Open in Place. It has both Mac and iOS apps, which is a hard and fast requirement for me these days.
Moving to iA Writer
The first step in this process was to move my existing files from Ulysses and Bear over to iA Writer. Ulysses was simple, I just exported my files to iA Writer’s iCloud Drive folder and they showed up in the app.
Bear was a bit harder because it has a very different metaphor. Rather than files and folders Bear has a flat list of documents organized using tags. While iA Writer supports tags, they’re clearly secondary to the file/folder structure. iA Writer also doesn’t allow for nested tags, which I use pretty heavily in Bear.1
I decided to try to turn my Bear tagging system into nested folders in iA Writer. To do this, I first made sure that everything had a tag of some sort, then exported all of it to a folder on my hard drive. I wrote a Python script that identified the tags by looking for lines starting with a hashtag that was not followed by a space or another hashtag (which would be Markdown headings rather than tags). The script created a folder in the iA Writer iCloud Drive directory for each tag (and within each of those folders for each subtag) and copied the text files into the appropriate folders. I did have to do some manual tweaking afterwards, but I managed to translate my nested tag structure into nested folders a lot more easily than if I’d tried to do it manually.
Likes and Dislikes
Perhaps this is not very consequential, but I don’t think iA Writer looks a nice as Bear. It’s rather monochromatic compared to Bear’s nice use of accent colors.
On the functional side, I like the fact that iA Writer uses vanilla Markdown with some very lightweight highlighting rather than trying to do something fancy and different the way Ulysses does (and Bear, to a lesser extent). One area where I wish they’d go a little further with the Markdown highlighting is to do a better job visually differentiating between different levels of Markdown heading. All headings look the same, and are basically just shown in bold.
I have run into a few bugs. Most annoyingly, the iOS app sometimes freezes when I try to drag and drop text, either within the app or dragging to another app in split view. Copy and paste work fine though, and I really like the ability to move lines (or highlighted blocks of text) up and down with the keyboard. This is especially great on the iPad which lacks some more traditional text manipulation capabilities that you can do with a mouse.
It’s very common for something I write at work to start as a Markdown text document, then get exported to Microsoft Word to share with my colleagues. I like the results of iA Writer’s Word export quite a bit better than Bear or Ulysses.
I may need to rethink my organizational scheme to work better with folders. I’ve got stuff broken up into a lot of different, very specific folders, with lots of folders at the top level and, in some cases, nested quite deep. This worked well with Bear’s tagging system, but I’m not sure this is the best way to do things in a files and folder system like iA Writer’s. Thankfully, iA Writer’s file search capabilities are quite good and very easily accessible from anywhere within the app.
If I do decide to reorganize my file system that will definitely be a task to do on the Mac. Moving files within the app on the iPad is not very intuitive.
On iOS, iA Writer includes a Command Keyboard that can be used to insert common markdown tags, special characters that are hard to get to on the iOS keyboard, etc. There’s a ton of customizability behind this so you can set it up to have exactly what’s most useful to you. I particularly like the fact that it’s available on the iPad even when you have an external keyboard attached.
A change I’m going to stick with
Overall, I’m pretty happy with iA Writer. Having one app for all my writing simplifies my workflow and I like the vanilla approach to Markdown. I’ve gone ahead and cancelled my Bear and Ulysses subscriptions and at least for now, I’ll be using iA Writer as my primary writing app.
A “work” tag with separate tags within it for individual projects, for instance. ↩︎
I’ve been intrigued by the concept of a personal retreat ever since I heard Mike Schmitz talk about it on Free Agents a while back. He described how he goes off on a “retreat” every three months to review, think, and plan. While I was interested, the discussion on the podcast was kind of barebones. When he announced that he put together a video course I jumped on board pretty quickly. Unfortunately, it came along at a very busy time for me, with the holidays and some travel for work, so I didn’t get a chance to actually do the course until late January.
After watching the videos, I was very eager to put this into practice and wanted to get started right away. While I wanted to take advantage of this burst of enthusiasm one obstacle was finding a location on short notice.1 Mike emphasizes not doing the retreat at home or another familiar (and distraction-laden) environment. He also maintains that to give the retreat the attention it deserves, you really need about eight hours, especially the first time you go through the process.
Doing it in the great outdoors was appealing in concept, but probably not in practice in January. I had all sorts of ideas for fun and interesting locations (traveling to a distant city, doing it on a long-distance train trip, etc.) but most were too expensive or required too much lead time. I looked into renting an office or conference room for a day, but that whole process seems unreasonably difficult.2 In the end, inspired in part by CGP Grey, I just got a local hotel room for a couple of nights.3
Preparing for the Retreat
To get ready for the retreat I watched the course videos a second time and took copious notes. If I had one suggestion for Mike, it would be to beef up the workbook to include more of the prompts and advice from the videos.4 There’s a lot of good stuff that didn’t make it into the workbook.
I also listened to an episode of The Productivity Show where Mike talked about his personal retreat practice. This predates the personal retreat course, so some aspects aren’t really as developed, but I still found it useful.
After dinner the night before the retreat I packed up a change of clothes, pens, pencils, and notebooks, along with the course workbook (both printed and in PDF on my iPad). I also assembled some food and drinks so I wouldn’t be distracted by needing to find a restaurant for lunch.5
One of the first things I did after checking in was put my iPad into Airplane Mode and my iPhone into Do Not Disturb (with a strong vow not to open it up and look at it until after I was done with the retreat). Since part of the point of making this, a “retreat” was to avoid distractions, I figured that it would be good to start detaching from my usual diet of digital interactions the night before. Cut off from my usual digital feed, I made an early night of it.
The Retreat
The next morning I hit the hotel fitness center and their complimentary breakfast before settling down in my room for the retreat.
Mike based the personal retreat idea off of some of the concepts presented in the book The 12 Week Year. I’d read the book, and I liked the concept, but I found it hard to implement. The core of it seemed like a good idea, but it had some extraneous stuff around it. The Personal Retreat course is a lot more focused.6
Based on what he said on the Productivity Podcast and Free Agents, Mike started doing quarterly personal retreats because he’d had trouble implementing his 12 Week Year goals. It’s intended to provide time to look back at the past three months and ahead to the next three. However, it goes quite a bit beyond just quarterly planning, encouraging you to take a look at your values and long term aspirations and so your plans for the next three months are taking you where you want to go in life.
Core Values
The retreat starts out with the big picture: defining your core values. Mike has some excellent questions to get you thinking about these. I answered all of them, then went back through trying to pick out the common threads by tallying up how often certain things got mentioned and making a mind map of how related ideas clustered together.
I’m usually more of a digital guy, but I made a last minute call to do this on paper in a Field Notes Steno Book, rather than on my iPad.7 Instead, I used the iPad to display my notes (including all of Mike’s prompts and questions). I did this using iA Writer’s focus mode. It highlights one line by graying out everything else, so it helped keep my attention on the particular prompt I was working on.
I ended up listing my core values as short sentences starting with “I am…”. Mike recommends 4-7 core values. I picked 5, but I did cheat a bit by making some of them compound (two related values, like “I am a writer and teacher”).
Between each exercise, I spent a few minutes walking around the hotel to clear my head.8
Where are you right now?
The next exercise focused on the question, “Where are you right now?” It involves an inventory of your commitments and responsibilities and assessing your satisfaction in different areas of your life. I’ll be honest, I didn’t find that this provided quite as much insight as some of the other exercises, though that may just be a product of what my particular commitments are and where my life is right now.
Designing the life you want to live
In contrast, the exercise on designing the life you want to live really grabbed me. Mike has created some great prompts to get you thinking in detail about what you’d like different aspects of your life to be in the future. I almost had too much fun writing about a day in my life five years from now. I probably crammed way more stuff in there than could realistically be done in a day (maybe next time it needs to be a week in the life of my future self).
Retrospective - Accomplishments
From the future, we turn to the past; the next exercise involves looking back over the past three months and listing your accomplishments. I was a bit skeptical when Mike said to allocate 1-2 hours for this, but it did take me over an hour and I filled two and a half pages of the Steno Pad with accomplishments. Not all of these are earth-shattering by any means, but they’re all things that moved the ball forward in one or more areas of my life (making a presentation for work, writing a blog post, etc.).
Thinking of all of these was difficult, but I found a few things that helped. I started by just brainstorming, but when I ran out of steam trying to remember things off the top of my head I looked back over my calendar to see what I’d been doing for the past three months and perused my blog to see what I’d posted there. What really helped was the gratitude journal I’d started keeping after taking Shawn Blanc’s Focus Course. Rather than being a full journal, this just involves writing down one accomplishment and two things I’m grateful for every day. Many of those daily accomplishments are too small for the personal retreat list, but others were large enough to make my quarterly list or prompted me to think of related things that should be listed. One thing I found was that in many cases, the daily accomplishments represented incremental progress on more significant accomplishments that did belong on the quarterly list. I may want to start calling out those bigger things explicitly as I go along, rather than waiting until three months later.9
Retrospective - was What you’re going to change
After a break for lunch, I started up on the second half of the retrospective: thinking about what things you’re going to change. Mike has a nice, structured way to do this involving looking at what went well and what could have gone better and what lead to these outcomes. This, in turn, leads to the three critical questions: What should I start doing? What should I stop doing? What should I keep doing?
For me, this process mostly lead to practices, rather than commitments, which I’m not sure is what Mike had in mind (looking back it’s a bit ambiguous). However, it worked for me, and I think the outcome has been very useful in terms of reinforcing good behavior, discouraging things that are hindering me from accomplishing my goals, and brainstorming ways that I can do better.
Setting your goals
The culmination of all of this, the core values, where you are right now, designing the life you want to live, the retrospective, comes in setting your goals for the next quarter. Mike recommends no more than three goals, and if you’re doing this to the first time, limiting it to even fewer, just one or two. I ended up picking two goals, and I kind of cheated a bit since my first goal, “Spend my time more intentionally” is kind of a cross-cutting issue that affects all sorts of areas. My second goal for the next three months is to write more.
Mike talks about how your goals should be connected to your core values and vision. I actually found it worthwhile to write out for each goal which core values it supports and how and which pieces of my 5-year vision it connects to. I also noted how each goal connected to things I said I should keep doing, start doing, and stop doing. For my time goal, this ended up being quite the task, since how I manage my time ends up touching so many other areas that I filled two and a half pages of my notebook writing it all out. The process really reinforced how being more intentional with my time could have a significant, positive impact on my life.
Another thing Mike emphasizes is breaking each goal down into milestones and daily habits to help ensure you actually accomplish it. The goal is the “what,” the milestones and daily habits are the “when” and “how.” Neither of my goals were all that amenable to milestones, so I didn’t set any. They are ripe for daily habits, however.
For spending my time more intentionally, my primary habit is going to be time blocking every day.10 This is something I’d been doing last year, but I’d kind of fallen off the wagon. After I stopped time blocking it felt like I wasn’t being as productive with my time, which is part of the reason I’d like to start up again.
Essentially, this time blocking practice involves writing out a schedule for each day, saying what I’ll be doing and when. That way I know what I’m supposed to be working on at any given time. It keeps me from having to make a decision of what to work on in the moment and makes it less likely that I’ll fail to decide and end up diddling around on the internet.
Of course, things come up, and there will be times when I have to adjust on the fly.11 That’s why my second habit to help me spend my time more intentionally is to do a post-mortem every day and look at how I actually spent my time compares to how I’d planned to spend my time. Did something unexpected come up? That’s fine; is it something I could account for in the future or is it something truly unexpected? Did something take longer than expected? That’s ok; how can I do better at estimating how long this sort of thing will take? Did I just blow off the schedule? That’s not really ok.
When I’d been doing time blocking last year I just did it for my working hours. This time around I decided that I’ll be applying it to my entire day. That doesn’t mean I’ll be working 24/7 though. One of my regrets about frittering away my time is that when I look back on how I spent my recreational time I spent a lot of it in ways that I don’t really value (primarily frittering it away on the internet) rather than recreational activities that I value more (reading, playing video games, watching good TV shows). I’d like to change that and blocking time for specific types of leisure is a way to do it.
For my goal to write more, my only habit is to write every day. It doesn’t matter what. Could be fiction, non-fiction, a blog post, a novel, anything. Just as long as I’m spending some time every day moving the cursor.12
To track my progress towards these goals, I’m going to track how many days I time block for, how many days I do a post mortem, and how many days I write for at least 30 minutes. I’m not going to track how much I write, or how many days I stick to my schedule. The goal for the next three months is simply to do these things consistently.
The other aspect of goal setting Mike talks about is looking at your commitments for the next three months and seeing what might interfere with accomplishing your goals. I wrote out my commitments, using the list I developed back in the second exercise, looking through my calendar, and thinking about what else I had coming up. It’s a long list, but a manageable one. In addition to making sure it wouldn’t interfere with my goals, getting these commitments out of my head and onto one sheet of paper was also valuable in and of itself.
Executing the Plan
The final exercise is to plan your ideal week. One of the biggest obstacles to achieving these kinds of goals is not setting time aside to work on them. The ideal week exercise allows you to plan out when you’ll work on your goals for the next 12 weeks. Of course, not every week is ideal, but this at least provides a starting point.
Obviously, this complements my goal of spending my time more intentionally and the time blocking habit quite nicely, so I kind of went whole hog on this exercise. I abandoned my paper notebook and went digital, breaking out the Numbers app on my iPad and using it to block out an ideal week in 15-minute increments. I set aside time for writing every morning, time for planning out the following day, and time for doing a post-mortem on the day every evening. I also made some other adjustments from how I’m currently spending my time (notably, a lot less time on the internet). Everything got color coded as well. Like I said, I really went whole hog.
As a reward for all this effort, I made myself a nice dinner (baked boneless buffalo wings, one of my favorites) and sat down with a drink and the latest episodes of The Grand Tour.13
The Results
I feel like my first personal retreat has been an incredibly useful experience, one that will pay dividends going forward. Of course, where the rubber meets the road is actually going out and implementing these habits and achieving my goals. We’ll see where I stand in three months.
In addition to the quarterly goals and planning, the retreat also helped with some deeper insights. Defining my core values and imagining the life I want to live five years from now are valuable beyond just setting goals for the next three months. Listing out my accomplishments from the last three months was encouraging. For a time in my life that I didn’t feel was very productive I actually accomplished quite a bit.
One thing the retreat helped me realize is that I have a “teacher” itch that isn’t really getting scratched right now. That’s not something I can really remedy in the next three months; rather, it’s something to work on long term (for now I’m going to try to scratch it by writing more).
As I mentioned earlier, I’d read The 12 Week Year and while I liked the concept, some of the other stuff in the book kept it from really grabbing me. Having done the personal retreat (and gotten so much out of it), I feel like I should try rereading the book and see if there are aspects of it resonate more with me now.
One other thing I learned from this retreat was that not looking at the internet when I had my phone out for some other reason was surprisingly hard. It wasn’t even a lack of willpower so much as thoughtlessness on my part. As soon as I was done with what I’d gotten my phone out to do (check my calendar, log some food or exercise, etc.) my thumb just instinctively just went to Safari, Reeder, or Spark. I’m a bit disturbed by just how automatic it was, but it’s a problem outside the scope of this personal retreat.14
Changes for Next Time
I’m definitely doing this again in three months. While it went really well this time I can already see some tweaks, I want to make. For one, I think that I’ll make taking stock of commitments for this quarter a separate exercise of its own, one that comes before goal setting. That way I can take these commitments into account when setting my goals (or change my commitments to accommodate my goals).
Of course, I’m anticipating that there will be differences just because it will be the second time through the process. This is one thing I wish Mike covered a bit more in the course, though I can see why it’s mostly geared towards first-timers. Next time I’ll already have definitions of the core values and vision of my future life (though its probably worth going through the exercises again to see if there’s anything I want to change). I’ve scanned my notes from the retreat and stashed the notebook where I’ll hopefully be able to find it in three months, so I’ll have all of my material from the first retreat available for reference. Of course, the big change will be assessing how well I did on my goals and the associated habits for this quarter.15
One thing I’d like to change between now and then to make the retrospective easier is to do a better job tracking my more significant accomplishments as they happen, rather than having to try to remember them months later.
Something that I won’t change is doing the retreat on paper. That worked really well; it helped keep me focused and slowed me down a bit (in a good way). I did realize about 3/4 of the way through that I need to leave more blank space in the notebook as I write so I can go back and add things that I think of later. I guess I’m too used to doing stuff digitally where it’s easy to insert content in the middle of what I’ve already written.
While the hotel room worked out well, I may consider some other options that more advance planning (and warmer weather) might make possible.
Concluding Thoughts
Doing the personal retreat was a really great experience. It’s already paid off with some great insights, and I think it’s going to continue to pay off over the next three months. I’ll definitely be doing it again.
I really want to thank Mike Schmitz for developing the Personal Retreat course. The way he’s structured the retreat works really well, and it includes some great prompts and questions to really help you get at things that can be hard to pin down, like your core values and a vision for your future. I’d definitely recommend the course and the practice of regularly doing a personal retreat.
Hopefully next quarter around I can set things up further in advance. ↩︎
Most of these places don’t even list their prices online, making it hard to tell if it’s even a reasonable option. In this day and age making someone interested in buying your product submit their contact info as a sales lead and wait for someone to get back to them is awful. ↩︎
Check-in and check-out times mean that if you want eight uninterrupted hours in a hotel room you really need to stay for two nights. ↩︎
It would be nice if the videos were downloadable. ↩︎
I’d booked a hotel room with a kitchenette, so I had a decently sized fridge and cooking facilities. ↩︎
In retrospect, I really wish I brought one of my Panobook notebooks. It would have been perfect for this. ↩︎
This made me glad I went with a hotel room rather than the cabin at one of the state parks I’d been considering. It was 18 degrees this morning, so going out for a walk would have meant getting all bundled up every time. ↩︎
Around this time it started snowing outside. I’m really glad I didn’t decide to do this outdoors. ↩︎
David Sparks sometimes calls this “hyperscheduling,” though I don’t really like that term. ↩︎
As David Sparks puts it, “A calendar is a soup rather than a puzzle.” ↩︎